::Edit:: Updated story to new theme/proposal.
The potato sack is trapped on a ledge. A another (safe) ledge is near by, yet too far away for jumping distance. Rather than attempting to jump the chasim, the sack takes some of the stitches from his edge and uses it as a lasso. Using the lasso, the sack catches a branch on the nearby ledge and swings across.
Monday, March 31, 2008
Wednesday, March 26, 2008

5 Ideas for the Final Project:
1-
Objective: Escape from a room, undetected
Obstacles: A room full of other sacks (Does not interact, but simply avoids)
Resolution: Changes shape to blend in with the back ground as he gets closer to the door.
2-
Objective: Drink
Obstacle: Twist-Top bottle
Resolution: Twists itself around the bottle
3-
Objective: Get to the top
Obstacle: A 90 degree incline too tall to reach
Resolution: Pulls a string from his stitching and uses it as a rope
4-
Objective: Get to the other side
Obstacle: A deep pit
Resolution: Pulls a string and uses it to swing across
5-
Objective: Reach the potato
Obstacle: A room full of saws, blades and potato peelers
Resolution: Duck Dodge Dip Dive
Friday, June 22, 2007
Finally, in the end after all the small details have been added, I began to apply the statuesque qualities rather than painting or attempting a mimic of life. A soft gray was chosen for the stone-feel with the texture minimum to none. The base was a simple cube manipulaed in Maya and imported into ZBrush.

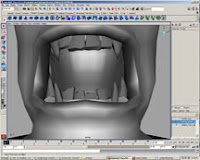
The final touches to the model, as far as modeling and detailing is concerned, were to the face. While most prefer to complete this first and move on to the body in order to fit the face, I prefer to fit the face to the body. The job becomes much easier when you already know how much body-fat can be translated into the face rather than attempting to judge off such a small example as a head.
The creases at the corner of the mouth were bulked and stretched to giev an impression of absolute pain. The brow was lowered and cringed.
For the eye itself, i imported a simple sphere from Maya and used inflated/smooth/and ZSub for the appearance of a destroyed socket.
I used the inflate and smooth tools in an attempt to mimic the seepage of a collapsed eye.

After turning the head towards the right shoulder for counter-balance of the torso, I began shaping slight folds of skin on the back of the neck and upper shoulder in order to imitate the softness of the fatty tissue which overlapped the muscular build. The softness of skin over the iron of muscle.

After much consideration, I believe my model needed one last adjustment in the structural pose. My original intention was to cover his eye based on the natural instinct to clasp a wound...but that complicated too many things. While it would have made my job easier to hide the face, I would have also lost the main point and ability to express the situation.
I stretched his right arm towards the sky, fingers stretching and almost longing for touch. The mere form of the hand and fingers can express much more than most may understand. "The Creation of Man" within the Sistine Chapel is the perfect example of my point.


Wednesday, June 20, 2007


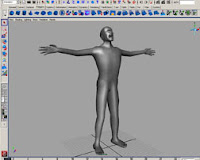
After creating a basic skeleton, I began to extrude a cube to fit the basic outline of the human figure. Once the basic outline was accomplished, A few basic details were added. One eye, for example, rather than two. I also bulked up to mid section so that, once imported into ZBrush3, it would be less time consuming and an easier base model to mold.


Subscribe to:
Posts (Atom)